Friday, July 26, 2024

Top-down knitted top pattern basic (with a garter stitch yoke)

 Reference patterns:

1.   Lady chartreuse sweater by Sylvie Polo

https://www.ravelry.com/patterns/library/lady-chatreuse-sweater

2. February Lady Sweater by Pamela Wynne.

 My hack of these patterns:

 Wool I used: Patons Jet (variegated – contained orange, purple and red wool muted) Colour: 4  Lot: 757 376

 Needles:  5.5 mm circular

 Size I made: Large


 Body width:  (from one armhole to the next – across the body) = 22 inches

Body length:  (from top of sleeve to bottom of sweater) = 24 inches


Needles:

• US 8 (5 mm) circular needle or size needed to get gauge

• US 8 (5 mm) double-pointed needles or size needed to get gauge

Sizes : (XS, S, M, L, XL)


NOTE: THIS GARMENT IS KNITTED IN THE ROUND ON CIRCULAR NEEDLES (ie ALL stitches are on the RIGHT side of the garment)


COLLAR:

Cast on (83, 83, 87, 91, 95) stitches

work 8 rows in moss stitch as follows:

R1, R3, R5 and R7 : K1, P1

R2, R4, R6 and R8 : P1, K1


YOKE:

R9: K1, P1 over the first 8 stitches, K(6, 6, 7, 8, 9) , (PM, K1, PM), k 11, (PM, K1, PM), K ( 28, 28, 30, 32, 34) , (PM, K1, PM), k 11, (PM, K1, PM) , K (7, 7, 8, 9, 10) K1, P1 over the last 8 stitches 

R10: (first increase row): * K1, P1 over the first 8 stitches, K to marker, m1, slip marker, K1, slip marker, m1 ( 2 stitches added)* Repeat from* 3 times, K to  last 8 stitches, K1, P1 over the last 8 stitches 

Repeat rows 9 and 10 a total of (18, 19, 21, 24, 27) times, working a buttonhole on an even row every 2.5 inches. (227, 235, 255, 283, 311) stitches, remove markers.

Buttonhole row (WS): K1, P1, work buttonhole (see how to knit buttonholes below), K to last 8 stitches, K1, P1 over the last 8 stitches 

“Small buttonhole”: [yo, K2tog, P1, K1, K1, P1]

 “Larger buttonhole”: [ssk, double yarn over, K2tog, K1, P1] on the first row and then,

on the next row, [knit two stitches along the yarn (from the double yarn over)]

As said earlier, repeat rows 9 and 10 a total of (18, 19, 21, 24, 27) times


Separating the sleeves and body

Overlap the first and last 8 stitches: To do this, use a crochet hook or a needle and thread to sew together the first 8 stitches and last 8 stitches on the last row Ie row (18, 19, 21, 24, 27) depending on the size of your garment.

R1:  

Knit the RIGHT FRONT of the garment as follows:

K1, P1 to the first marker, remove marker and cast on 2 stitches (in doing so, ALL stitches on the right front of the garment have been completed) and 2 additional stitches have been added.

Transfer the right sleeve stitches onto scrap yarn or a holding wire as follows: Slip ALL stitches (between the first 2 markers and the 3rd and 4th markers) onto the scrap yarn or holding wire. Secure the ends of the yarn or wire so that the stitches cannot slip off.

Knit the BACK of the garment as follows:

Cast on 2 stitches, K,1, P1 until the 5th marker, remove the marker and cast on 2 stitches (in doing so, ALL stitches on the back of the garment have been completed) and 4 additional stitches have been added.

Transfer the left sleeve stitches onto scrap yarn or a holding wire as follows: : Slip ALL stitches (between the 5th and 6th markers and the 7th and 8th markers) onto the scrap yarn or holding wire. Secure the ends of the yarn or wire so that the stitches cannot slip off.

Knit the LEFT FRONT of the garment as follows:

K1, P1, across all stitches left on the needle (including the overlap of the first and last 8 stitches of the previous row)

NOTE: You should now have ALL the stitches of the front and back on the same circular needles, BUT, the right sleeve stitches and the left sleeve stitches are each held on their own separate needles (or on scrap yarn)


(NOW: Working across the RIGHT FRONT, BACK and LEFT FRONT of the garment:

R2, R4, R6 and R8: P1, K1

R3, R5 and R7: K1, P1

Now, secure the ends of the wire so that the stitches cannot slip off and transfer the needles onto the wire of the RIGHT SLEEVE


FINISHING THE RIGHT SLEEVE: (working on the round)

R1, R3, R5 and R7: K1, P1

R2, R4, R6 and R8: P1, K1

Cast off. The right sleeve is now complete

FINISHING THE LEFT SLEEVE: (working on the round)

Transfer the needles onto the wire of the LEFT SLEEVE

R1, R3, R5 and R7: K1, P1

R2, R4, R6 and R8: P1, K1

Cast off. The LEFT sleeve is now complete.


Transfer the needles onto the wire of the BODY.

You will now be working the FRONT and BACK of the body in the round ie ALL stitches are facing the knitter ie from now on when using a pattern, it will have to be re-written to make sure that ALL the rows are “RIGHT” side rows, ie there CANNOT be any wrong” side rows. The easiest way to do this is to use a chart as a guide.


Variation1: Basic Knit Body:

Knit all rows until the garment measures 23 inches from the shoulder to the bottom.

Work the next 8 rows as follows:

R1, R3, R5 and R7: K1, P1

R2, R4, R6 and R8: P1, K1


Reviving this Blog and an M.C. Escher knitting swatch pattern


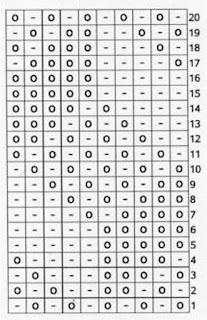
M.C. Escher pattern for knitting in the round

NOTE:

1.       This patterns is made up of (Multiples of 10 stitches) and 20 rows and can be knitted with any wool or needles. It is a swatch pattern and can be included in any garment/design  - depending on your preference

I have included the chart here.
o = knit
- = purl

ChChart :


3.

Written instructions:

Row 1: (k1, p1) repeat 5 times

Row 2: p1, k1, p1, k2, p2, k1, p1, k1

Row 3: k1, p1, k3, p3, k1, p1

Row 4:  p1, k4, p4, k1

Row 5: k5, p5

Row 6: k5,p5

Row 7: k4, p1, k1, p4

Row 8: k3, (p1, k1) twice, p3

Row 9: k2, (p1, k1) thrice, p2

Row 10: (k1, p1) repeat 5 times

Row 11: (p1,k1) repeat 5 times

Row 12: p2, (k1,p1) thrice, k2

Row 13: p3, (k1,p1) twice, k3

Row 14: p4, k1, p1, k4

Row 15: p5,k5

Row 16: p5,k5

Row 17: k1, p4, k4, p1

Row 18: p1, k1, p3, k3, p1, k1

Row 19: k1, p1, k1, p2, k2, p1, k1, p1

Row 20: (p1,k1) repeat 5 times


Friday, November 15, 2013

This blog will no longer be updated...

A big thank you to all my readers. I have decided to discontinue this blog. What would have been future posts about my knitting and crafting experiences will now be included in my other blog Healing scribbles, which currently deals with my icon writing, painting ceramics and art therapy activities.  I now want to expand it's content to include my interest in stories, ie how the stories we tell ourselves shape the people we become and the world in which we live and also my learnings on the environment.

I took this decision for a number of reasons, the most important one being the fact that I find it difficult to maintain multiple blogs. I also feel that consolidating all my interests together in one blog, makes for greater clarity and richness. I hope you will join me there...

Tuesday, September 10, 2013

32. Why I knit...

This is for my nieces, who are not sure whether or not they should consider knitting as a hobby.  It is also for anyone who has thought about learning to knit, but has reservations about it because they are not sure that they should invest their time and energy in mastering a skill which is well plain and simple, un-cool.  They could concentrate their efforts on something more productive and remunerative. Shouldn't they? Well they could, and might, but if they would like to hear the case for knitting, here it is:

Someone who did not know I knit, remarked to me that knitting is for losers of a specific breed - stupid women and old ladies. Who else would bother to waste their time and energy on knitting when you can go out and buy a perfectly good sweater, or scarf or shawl or whatever for a very little.  I am painfully aware that people who endorse this thinking, obviously have never made something with their hands and when that is the case, I have no basis for engaging with them to explain my point of view.  Some, will never know the pleasures of walking into a wool shop and that is their prerogative.  But if you are tempted to give it a try, but haven't yet, let me entice you...

You don't just walk in.  First, you eye the display in the windows letting whatever thoughts that come, arise and propel you inside. Next, you stand in the doorway, weighing up the mohairs and the shaggy wools, cashmeres and tweeds in your mind's eye.  After careful consideration, you decide which direction you would like to begin with. What should you do? Stroke the silks, ogle the 4 plys, squeeze the 8 plys, thumb through the patterns, tug at the swatches, examine the needles, or bobbins, or counters, or markers, or all of the above, scanning for something you do not own - yet? After a long, lingering saunter through the shop, when you have sampled its tactile and visual pleasures to your heart's content, you make an executive decision: Based on my skill level, budget, figure and wardrobe, today I will pick up this, this and this. Then, bag in hand, wallet lighter, you head for the exit.  Be warned, at this point, something inevitably catches your eye - that little thingo that was made for you to have today. Sometimes you indulge yourself, sometimes you don't, but mostly you do.

When you finally reach home, you pack away the purchases, with the wool stash or the needle pile or wherever appropriate. It could lie there for weeks, months, years, well even a decade or two. It could also outlive you and I can testify to that - I have been to a nursing home store room crammed with hanks of unknitted dreams that still languish in the dust.

But enough of that.  Knitting for me is about exuberance, fun and lucky accidents which you can nudge along. Sooner or later, when on a lazy trawl through the internet, you chance upon the perfect pattern, (that you later realise has been sitting on Ravelry for years and years) you save it, print it, highlight it and  scale it to your measurements.  Then you fish out the needles, the wool and the measuring tape. Now, if you are good, you swatch.  If you are bad, like me, you don't and live to regret it, Be warned: if you don't swatch, many long hours of painstaking lace and cabling, inexorably wind up reduced to a wooly tangle ready to be knit up again, this time with the wisdom of hindsight. Then you get on with the real thing - the business of knitting.  Finally, after eons, it is all knitted up, blocked and ready to wear. At this stage, you grab a cuppa, a coffee, a chocolate, a red or white or whatever it is that you need to celebrate the pure unadulterated joy of having made a bit of sheer heaven with your own two hands. You wallow in it, letting it seep into your soul and swell you with pride and encouragement. THAT is why I knit.

Of course I could do more "useful", "meaningful" things with my time (and I do), of course I could buy something with a better finish and for better value at a fraction of the price (and I do); BUT I still knit.  For many years the results of my efforts were wonky, too large, too small, unsuitable or just plain ugly.  But I still knit, because if I didn't, I would lose the opportunity to connect with that intangible something that enhances my sense of well being and feeds my soul. I would never have an object, fashioned by my own fingers and would never know the delight and rightness inherent in the process of creating it.

To those who think that knitting is about throwing a piece of string between a pair of sticks, well you are right, it is, but it is so much more. To produce a customised garment takes many years of trial and error, lots of disasters and near misses. You learn to grit your teeth and try again, you build your persistence and staying skills. You also learn to cheat - I have used mathematical and programming skills to crack patterns which initially appeared beyond my capacity to reproduce - you have to be resourceful and think laterally if you want to complete a challenge. You connect with the army of forebears who have gone before you - some related to you by blood and others by interest. 


In this product- and profit-oriented world, we have forgotten to enjoy the small things, we do not put a premium on feeding our souls. I do, and I know a lot of women and men who do too. I have never met most of these people in real life, but I still think of them as my friends - a large-hearted, skill-sharing, on-line brother/sisterhood that I can tap into at three in the morning or in the middle of the day, a community spread across the globe, that shares and supports total strangers, just because they all knit.  They are for me the living embodiment of kindness and generosity in what could otherwise appear to be an indifferent world. They are another reason why I knit and I hope you will too.

- Gillian Valladares Castellino

Tuesday, April 9, 2013

31 Super quick mitts

This is the quickest fingerless mitten pattern I have done. I have relatively tiny hands and the mitts fit very snugly, so you might want to increase the number of stitches for larger hands. I used the magic loop method and knitted them in the round.


I created them using:
8 ply wool and 6 mm needles

Key
K = Knit
P = Purl
K2tog = Knit 2 together
K2tog tbl = Knit 2 together into the back loop

Method: (Make 2)
Cast on 28 sts and distribute evenly over two needles. Place marker at the start of the round.
Rows 1 & 2 (rib): K1, P1

Begin pattern: (4 row repeat)
Pattern Row 1: K to end of row
Pattern Row 2: K2tog to end of row
Pattern Row 3: K2 into each stitch to end of row

Repeat the 4 pattern rows 6 times (ie 7 pattern sets in total) ie Pattern Rows extend from Row 3 to Row 30

Row 31: K2, K5 onto scrap yarn, move the 5 stitches onto the Left Hand needle and knit the remaining stitches using the main yarn, to complete the round.

Continue in pattern (using only the stitches done with the main yarn and ignoring the stitches on the scrap yarn) for 11 rows ie from Row 32 to Row 43

Rows 44 & 45 (rib): K1, P1

Cast off as follows: K2tog tbl, slip st on Left Hand needle to end

Thumb hole:
Pick up 12 stitches (ie 6 on each needle) along the scrap yarn before removing it.

Knit 5 rows

Rib 2 robs

Cast off


09 10 11 12
Blogging tips